It concerns the following topics:
When all hardware components of your PC are so far configured that you are satisfied then you have earned your break :-)
After this you can start to work with the graphical user interface KDE. How this works you can find in Lesson 3.
| |
Click at the Knoppix-KDE-Desktop at the bottom left with the left mouse button on the symbol with character "K" in a gear (this is comparable with the <Start> icon in Windows 98/NT/XP...). |
| |
Click in the menu that opened with the left mouse button at the entry "Settings". |
| |
Click in the sub menu that opened at the entry "Control Center". |
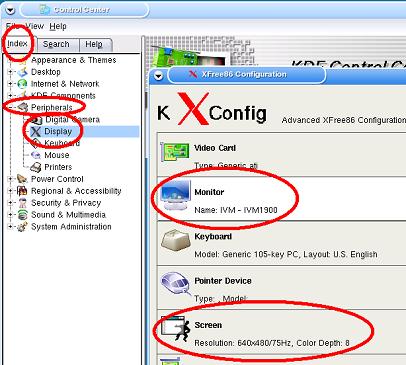
The Control Center window will open. Click there with your left mouse button at the tab "Index" first on "Peripherals" and there on "Display". With this you open the "XFree86 Configuration"-window, where you can find under "Monitor" and "Screen" the screen resolution and raster frequency:
Make the changes that you want and close the "XFree86 Configuration"
window by clicking on <Quit>. Answer to the question
if you want to save your settings with
To make the changes effective, KDE must be re-started as follows:
| |
Click at the Knoppix-KDE-Desktop at the bottom left with the left mouse button on the symbol with character "K" in a gear (this is comparable with the <Start> icon in Windows 98/NT/XP...). |
| |
Click in the menu that opened with the left mouse button at the entry "KNOPPIX". |
| |
Click in the sub menu that opened at the entry "Utilities". |
| |
Click in the sub menu that opened at the entry "Chose/Restart KNOPPIX Desktop". |
In the new window that opens, the "KNOPPIX X-Restart" window,
select "kde: KDE - The K Desktop Environment" and click on
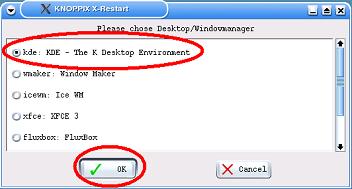
Answer <Yes> to the question if you really want to
restart the X-Server now. Wait until KDE is restarted with its
new settings.
You have now successfully set the resolution of your screen :-)
In worst case you cannot configure your monitor. In this case make a note to the developers of Knoppix through a form on WWW and wait for answer or write a bug report.
[Back to the beginning of the page]
| |
Click at the Knoppix-KDE-Desktop at the bottom left with the left mouse button on the symbol with character "K" in a gear (this is comparable with the <Start> Symbol in Windows 98/NT/XP...). |
| |
Click in the menu that opened with the left mouse button at the entry "KNOPPIX". |
| |
Click in the sub menu that opened at the entry "Configure". |
| |
Click in the sub menu that opened at the entry "Configure printer(s)". |
| |
Click in the window that opens "Printer - KDE-Controltab" at top left with your left mouse button at the magic wand symbol (adding a printer/classe). With this the Printer Configuration Assistant is started. |
The assistant will pose one by one the following questions::
How is the printer connected (is it a local one at the parallel
port or at the USB port) or is it a network printer.
What is the name of the printer manufacturer and the model type.
Which driver should be used for this printer model. (When more then one driver shows up, you can test the drivers one by one and select the one that performs the best.)
In the "Printer Test" window you can with one click at the
button ![]() set the paper size to "A4" , etc. and with another click at the button
set the paper size to "A4" , etc. and with another click at the button ![]() print a
test page.
print a
test page.
If banner pages should be printed.
If there should be usage restrictions.
What is the name of the printer.
After the configuration of the printer, the assistant is closed and
you are back in the window "Printers - KDE Control Module". With a click,
bottom right, on ![]() this window is closed.
this window is closed.
You now have your printer configured and it is ready to print! :-)
In worst case you cannot configure your printer. In this case make a note to the developers of Knoppix through a form on WWW and wait for answer or write a bug report.
[Back to the beginning of the page]
With a bit of luck, Knoppix recognizes your sound card when it is
booting. You'll hear a short sound sample when KDE starts up. If you
hear this there is no need to configure your sound card.
If you do not hear the sound sample when KDE starts up, then you have to reboot with the cheatcode: "knoppix alsa".
Details for booting you will find in "Knoppix boot details". A description of the cheatcodes you will find in: knoppix-cheatcodes.txt. Look for ALSA.
When this does not work, you can try to configure your sound card
with hand and feet. That goes like this:
| |
Click at the Knoppix-KDE-Desktop at the bottom left with the left mouse button on the symbol with character "K" in a gear (this is comparable with the <Start> icon in Windows 98/NT/XP...). |
| |
Click in the menu that opened with the left mouse button at the entry "KNOPPIX". |
| |
Click in the sub menu that opened at the entry "Configure". |
| |
Click in the sub menu that opened at the entry "Soundcard configuration". |
The program "Sound Configuration Utility 0.57" will be started in a
new window.
Acknowledge with an <OK>, that all PnP-cards should be tested.
Remark: Use the <TAB> key (on the keyboard directly
left of the key <q>) to switch between the selectable items (...
from <OK>
to <Cancel>).
Ignore the warning that this program should not be run under X-windows, by selecting <yes>.
The program will only show sound cards that it has found on your system. Acknowledge them with <OK>.
The program offers you to play a sound sample. Acknowledge this with
<OK>
[Back to the beginning of the page]
Put a paper that you want to scan on your scanner.
| |
Click at the Knoppix-KDE-Desktop at the bottom left with the left mouse button on the symbol with character "K" in a gear (this is comparable with the <Start> icon in Windows 98/NT/XP...). |
| |
Click in the menu that opened with the left mouse button at the entry "Multimedia". |
| |
Click in the sub menu that opened at the entry "Graphics". |
| |
Click in the sub menu that opened at the entry "xscanimage". This starts the program xscanimage. When the program finds a scanner it opens a window with the name of the scanner as title. (When it does not find a scanner, the program automatically closes again. Then you have do do some work to take care that the scanner is found, see below...) |
(1) When the scanner is found,
click with your left mouse button at the button
Picture: Both windows of the program xscanimage
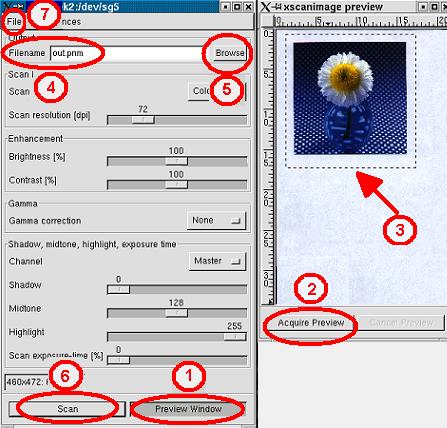
(2) Click with your left mouse
button in the "xscanimage preview" window at the button
(3) Select a region of interest by
going to the top left of the part you want to actually scan, press the
left mouse button, keep it pressed and go to bottom down of the region
you want to scan. Then release the button. The resulting rectangle is
the region that will actually be scanned on the actual resolution.
(4) In the window left you can
fill in at "Filename" the name of the image file
out.pnm is shown in our
example.
(5) With a click on <Browse> you can select in another window the directory in which the file has to be stored. Close the browse window with a click on <OK>)
(6) With a click on <Scan> (bottom left) the selected region of interest is scanned and stored in the file. This file can be made visible and further processed with programs such as GIMP (see Lesson 8).
Your scanner scans! :-)
(7) With a click on the menu "File" (top left) and then in its sub menu a click on "Exit" you will end the program xscanimage.
When your scanner cannot be found, it
might be so that your scanner is not supported. At the SANE-Web-Site under the
keywords "Supported devices" you can
have a look if your scanner is supported. Mostly scanners that
use the parallel port are not supported (see for this also Parallel Port
Scanners under Linux).
But it might also be so that the configuration of your scanner
is not right. For instance, if you have a USB Scanner from Epson, then
use the file /etc/sane.d/epson.conf,
delete the line "scsi EPSON"
and insert the line "usb
/dev/usbscanner0" instead, so that the USB scanner can be found.
Further information can be found under the sane-scanner-"driver",
readable through issuing a command "man sane", "man
sane-epson", "man
sane-usb" etc. in a command window (a console, e.g. ![]() -->
--> ![]() -->
--> ![]() ). (Browsing in
manual pages can be done by using the <space> bar. Ending the
manual pages can be done by typing the character <q> from "quit".)
). (Browsing in
manual pages can be done by using the <space> bar. Ending the
manual pages can be done by typing the character <q> from "quit".)
Remark: The commands sane-find-scanner and scanimage are not available.
In worst case you cannot scan with your scanner. In this case make a note to the developers of Knoppix through a form on WWW and wait for answer or write a bug report.
[Back to the beginning of the page]
Take care: A prerequisite is that PPPoE
(Point-To-Point over Ethernet) is used.
| |
Click at the Knoppix-KDE-Desktop at the bottom left with the left mouse button on the symbol with character "K" in a gear (this is comparable with the <Start> icon in Windows 98/NT/XP...). |
| |
Click in the menu that opened with the left mouse button at the entry "KNOPPIX". |
| |
Click in the sub menu that opened with the left mouse button at the entry "Network/Internet". |
| |
Click in the sub menu that opened with the left mouse button at the entry "ADSL/PPPOE configuration". |
The configuration window will open.
Further details are described in Configuration of PPP Over Ethernet (PPPoE) for Debian Linux.
If you still have questions, consult the "ADSL for Linux" site.
(A)DSL is now configured :-)
Remark: In a root shell (![]() -->
--> ![]() -->
--> ![]() ) you can monitor the (A)DSL-connection with
the command "pppstatus" and "plog".
With the command "pon
dsl-provider" and "poff" you can start and end
the (A)DSL service.
) you can monitor the (A)DSL-connection with
the command "pppstatus" and "plog".
With the command "pon
dsl-provider" and "poff" you can start and end
the (A)DSL service.
In worst case you cannot configure your (A)DSL connection. In this case make a note to the developers of Knoppix through a form on WWW and wait for answer or write a bug report.
[Back to the beginning of the page]
| |
Click at the Knoppix-KDE-Desktop at the bottom left with the left mouse button on the symbol with character "K" in a gear (this is comparable with the <Start> icon in Windows 98/NT/XP...). |
| |
Click in the menu that opened with the left mouse button at the entry "KNOPPIX". |
| |
Click in the sub menu that opened with the left mouse button
at
the entry "Network/Internet". |
| |
Click in the sub menu that opened with the left mouse button at the entry "ISDN connection". This starts the program isdn-config. |
The "RedHat ISDN config" window opens.
Click on the <Help> button. This opens very good help pages with which you can configure your ISDN-Hardware.
ISDN now configured :-)
In worst case you cannot configure your ISDN connection. In this case make a note to the developers of Knoppix through a form on WWW and wait for answer or write a bug report.
Picture: Entering the new (probably only in germany available) provider "msn" (Microsoft Network) with isdn-config
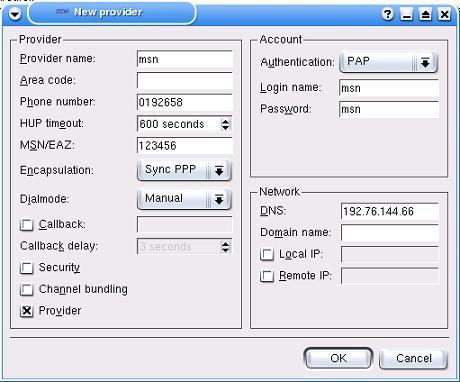
Remark: "MSN/EAZ:" has no meaning here. Any/no number will do.
[Back to the future (eh...) beginning of the page]
External modems (and also cellular Phones / GSMs and PDAs, that are uses as Modem) must first have an entry in the device file /dev/modem :
| |
Click at the Knoppix-KDE-Desktop at the bottom left with the left mouse button on the symbol with character "K" in a gear (this is comparable with the <Start> icon in Windows 98/NT/XP...). |
| |
Click in the menu that opened with the left mouse button at the entry "KNOPPIX". |
| |
Click in the sub menu that opened with the left mouse button at the entry "Network/Internet". |
| |
Click in the sub menu that opened with the left mouse button at the entry "/dev/modem connection setup (serial/USB/IRDA/Bluetooth)". |
The window "Connection Type" opens, in which you can select over
which type of connection
(serial/USB/IRDA/Bluetooth) your modem is connected to your PC.
In the next step, the system automatically tries to find the modem,
albeit that first you have to specify over which interface
(COM1, COM2, USB1 etc.) your device is connected.
After this the modem call-in to internet can be configured on your
PC:
| |
Click at the Knoppix-KDE-Desktop at the bottom left with the left mouse button on the symbol with character "K" in a gear (this is comparable with the <Start> icon in Windows 98/NT/XP...). |
| |
Click in the menu that opened with the left mouse button at the entry "KNOPPIX". |
| |
Click in the sub menu that opened with the left mouse button at the entry "Network/Internet". |
| |
Click in the sub menu that opened with the left mouse button at the entry "Modem Dialer". This starts the program KPPP. |
The "KPPP" window opens.
Click at the bottom of the window at < ? Help > and select "KPPP Handbook" . This calls the very good manual pages of the program KPPP, with which you can configure your modem.
Your modem is now configured! :-)
In worst case you cannot configure your modem connection. In this case make a note to the developers of Knoppix through a form on WWW and wait for answer or write a bug report.
[Back to the beginning of the page]
| |
Click at the Knoppix-KDE-Desktop at the bottom left with the left mouse button on the symbol with character "K" in a gear (this is comparable with the <Start> icon in Windows 98/NT/XP...). |
| |
Click in the menu that opened with the left mouse button at the entry "KNOPPIX". |
| |
Click in the sub menu that opened with the left mouse button at the entry "Network/Internet". |
| |
Click in the sub menu that opened with the left mouse button at the entry "Network card configuration". This starts the program netcardconfig. |
The "netcardconfig" window opens followed by more windows in which you have to insert various items (note that not all items have to be filled in at all times):
Which network card should be configured.
Whether the system needs to try with a DHCP-Broadcast to get data (such as IP-number) from a DHCP-Server or that this data should be entered manually.
What the IP-address should be.
What the network mask is.
What the broadcast address is.
What the address of the Default Gateway is.
What IP-address the Name server has.
The "netcardconfig "-window closes automatically.
With the command "ping NNN.NNN.NNN.NNN"
in a Root Shell (![]() -->
--> ![]() -->
--> ![]() ), where NNN.NNN.NNN.NNN
is the IP-address of the Default Gateway or the Name server) you can
test if the configuration setting is correct. The ping command can be aborted
after 30-40 seconds by simultaneously pressing the keys
<Ctrl> and <c>.
), where NNN.NNN.NNN.NNN
is the IP-address of the Default Gateway or the Name server) you can
test if the configuration setting is correct. The ping command can be aborted
after 30-40 seconds by simultaneously pressing the keys
<Ctrl> and <c>.
The computers that you "ping" should send back answer
packages with data about the round-trip time of the connection, and
when
you end with <Ctrl> <c> a resume is given on the number of
transmitted packages that match with the received ones and how many
packages were lost. This should be 0%.
When the ping test fails, then give in a root shell the commands
"ifconfig" and "route -n" and look if,
using the results of these commands, the network card (/dev/eth0) and
the router table are correctly configured..
Further information can be found in the manual pages that can be called
with the commands ![]() -->
--> ![]() -->
--> ![]() ). (Browsing in
manual pages can be done by using the <space> bar. Ending the
manual pages can be done by typing the character <q> from
"quit".)
). (Browsing in
manual pages can be done by using the <space> bar. Ending the
manual pages can be done by typing the character <q> from
"quit".)
The Network card is now configured! :-)
In worst case you cannot configure your network card. In this case make a note to the developers of Knoppix through a form on WWW and wait for answer or write a bug report.
[Back to the beginning of the page]
To avoid going through all configuration steps again after each (re)boot of Knoppix from CD, you have the opportunity *before* shutting down Knoppix, to store all relevant configuration data onto a floppy disk. :-)
That is done in the following way:
Put an empty, formatted, not write protected floppy in the
floppy drive.
| |
Click at the Knoppix-KDE-Desktop at the bottom left with the left mouse button on the symbol with character "K" in a gear (this is comparable with the <Start> icon in Windows 98/NT/XP...). |
| |
Click in the menu that opened with the left mouse button at the entry "KNOPPIX". |
| |
Click in the sub menu that opened with the left mouse button at the entry "Configure". |
| |
Click in the sub menu that opened with the left mouse button at the entry "Save KNOPPIX configuration". |
A window opens named "Create KNOPPIX configuration archive" in which you can indicate with check marks, which configuration files should be saved. Make your choices and close the window by clicking on <OK>.
In the next window you have to indicate where (on which device) you want to store the configuration files, in this case on: "/mnt/floppy [Floppy]". Make your choice and close the window by clicking on <OK>
When you are asked to put an empty formatted floppy in the drive,
then click on <yes> as you have already done this!?
Finally, acknowledge that the data was successfully written on the floppy by clicking on <OK>.
Your configuration files are now written on floppy! :-)
Note that, after this successful writing of configuration
data on the floppy, you have to take care that the configuration floppy
is in the drive and that you type at the next (re)boot of Knoppix from
CD in the Knoppix boot start screen: "knoppix floppyconf" (or
alternatively "knoppix floppyconfig") provided that you wish to use
them. (When booting from the Knoppix-CD the Knoppix boot start
screen shows at the bottom left the word: "boot:". At that place you
can
insert data with your keyboard. Details for booting you can find in
"Knoppix boot details".)
Remark: The boot parameters: "knoppix
myconfig=/mnt/auto/floppy" or "knoppix myconfig=scan" will not work!
The successful reading of configuration parameters from the configuration floppy is indicated by:
| |
|
|
|
Checking /mnt/floppy for KNOPPIX
configuration files... Found, now executing /mnt/floppy/knoppix.sh. Extracting config archive /mnt/floppy/configs.tbz... |
If you see these three lines, and nevertheless your
configuration is not restored,
then check the contents of the floppy, it should contain the file:
configs.tbz (a bzip2 compressed tar archive).
Proceed as follows: Open a root shell: (![]() -->
--> ![]() -->
--> ![]() ) and check in the root - window by
giving the command "mdir a:", if the floppy contains
the file configs.tbz
and if it is larger than 46 Byte. Is it not larger than 46 Byte then it
is empty and you probably did not check mark the configurations to be
stored before you saved the configurations onto the floppy.
Sorry, the thing that you have to do now is to configure Knoppix
again, select the configurations to be stored and store them on
floppy.
) and check in the root - window by
giving the command "mdir a:", if the floppy contains
the file configs.tbz
and if it is larger than 46 Byte. Is it not larger than 46 Byte then it
is empty and you probably did not check mark the configurations to be
stored before you saved the configurations onto the floppy.
Sorry, the thing that you have to do now is to configure Knoppix
again, select the configurations to be stored and store them on
floppy.
Is the file larger than 46 Byte, then give the command "
In worst case you cannot read/write a configuration floppy. In this case make a note to the developers of Knoppix through a form on WWW and wait for answer or write a bug report.
[Back to the beginning of the page]
Take care:
The basic philosophy of Knoppix is to access the hard disk of
the PC in a READ-ONLY way as much as possible, to
prevent changes in the data and the main operating system (e.g.
Windows) on this hard disk.
Writing onto
NTFS-Partitions means data loss! So keep your hands off NTFS partitions!
(When you want to try this anyhow, ignoring my warning, then please
read first the paper: "Geiselnahme - Microsofts NTFS-Treiber unter
Linux
nutzen" in c't 2004, Heft 4, Seite 200.)
USB-Flashcard-readers, USB-Memorysticks, external USB- and Firewire-disk, some through USB connected Digital cameras etc. are treated as (internal) SCSI-disks.
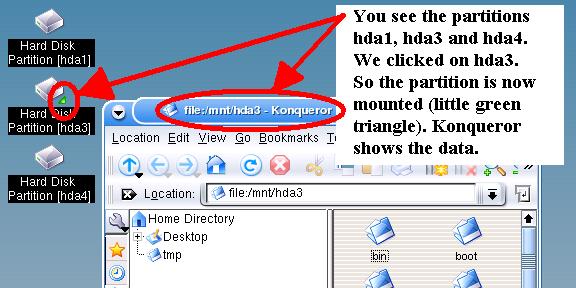
| Every partition of a hard disk shows in the
Knoppix-KDE-Desktop as an Icon. (Roughly they represent the disk
letters: C:,
D:, E: etc. under Windows.)
When you click on such an icon for the first time, then the partition is mounted. Access to the data from this partition is from then on possible. The KDE file manager Konqueror is started and shows the contents of the disk. Whether the partition is already mounted or not is shown with
a little green triangle. |
 |
You make a partition write able in the following way:
(When the partition is not mounted yet (no little green triangle) then you have to
mount it first, e.g. by clicking with your right mouse button on the icon and
then on the menu that opens with your left mouse button on "mount".
Then click with your *right* mouse button on the icon of the
partition that you want to mount write able.
| |
Click in the menu that now opens on the entry: "Change read/write mode". |
In the window that opens now the question is raised if you want to
make this partition write able. You answer this positively when you
click with your left mouse button on <Yes>.
Now you have write access to this partition! :-)
Note that: when the partition was already write mounted the
question comes if you want to mount the partition read-only. Answer
this (with your left mouse button) with <No>, so that your disk
partition remains write mounted. If you click <Yes>, then the
disk partition is remounted in read-only mode.
In worst case you cannot mount your disk partition in write mode. In this case make a note to the developers of Knoppix through a form on WWW and wait for answer or write a bug report.
(When you want to learn more on mounting disks, then read
further here.)
[Back to the top of the page]
When the camera is connected through the USB, then the camera is treated as a (internal) SCSI disk. Access goes through the icon on the KDE desktop. See further above under VIII.
| |
Click at the Knoppix-KDE-Desktop at the bottom left with the left mouse button on the symbol with character "K" in a gear (this is comparable with the <Start> icon in Windows 98/NT/XP...). |
| |
Click in the menu that opened with the left mouse button at the entry "Multimedia". |
| |
Click in the sub menu that opened with the left mouse button at the entry "Viewers". |
| |
Click in the sub menu that opened with the left mouse button at the entry "gtkam". This starts the program gtkam. (This is basically a graphical user interface for the program gphoto2.) |
| |
Click within the "gtkam"
window at the top and with your left mouse button on "Camera" and
in the window that opens then on "Add Camera...". With this
the " Select camera" window opens, in which you can enter which camera
is connected through which interface. With a left click at the button
with the triangle you can get a list of all cameras and their
connection possibilities (the serial Port 0 is the serial interface
COM1, Port 1 is COM2 etc.). Select your camera and acknowledge your selection with a left click on <OK>, which closes the window. |
| |
In the "gtkam"
window you can now see the pictures of the camera, which you can store,
delete, etc. with clicks on buttons in the top of the window. |
The access to your digital camera is now possible! :-)
| |
Remark: When you want to use a Web Cam,
then use the program gqcam. When you rather want to work with commands from a console (root shell), then use the program gphoto2. The command "gphoto2 |
When your camera model is not on the list of devices or cannot be
found by any of the programs then read the manual pages of gphoto2, gtkam and gqcam, that you can call with
the commands "man gphoto2", "man gtkam" and "man
gqcam" in a command window (a console, e.g.. ![]() -->
--> ![]() -->
--> ![]() ). (Browsing in
manual pages can be done by using the <space> bar. Ending the
manual pages can be done by typing the character <q> from
"quit".)
). (Browsing in
manual pages can be done by using the <space> bar. Ending the
manual pages can be done by typing the character <q> from
"quit".)
Also have a look at the excellent document USB Digital Camera HOWTO.
In worst case you cannot use your digital camera / webcam. In this case make a note to the developers of Knoppix through a form on WWW and wait for answer or write a bug report.
[Back to the beginning of the page]
Put a ZIP disk in the drive.
| |
Click at the Knoppix-KDE-Desktop at the bottom left with the left mouse button on the symbol with character "K" in a gear (this is comparable with the <Start> icon in Windows 98/NT/XP...). |
| |
Click in the menu that opened with the left mouse button at the entry "KNOPPIX". |
| |
Click in the sub menu that opened with the left mouse button at the entry: "Root Shell". A "Root" window opens. |
It is easy to access a built in (IDE or SCSI) Zip drive (see also under "Mounting Media").
In order to be able to access a Zip drive that is connected through
a parallel or USB interface, one must be sure that the matching kernel
module is loaded into the Linux kernel. Type the command "lsmod".
This shows all modules that are loaded in the Linux kernel.
For a ZIP drive that uses the parallel port, the module "imm"
(for new Zip-250 drives) or "ppa" (for older Zip-100 drives)
must be loaded. If this module is not inserted in the kernel, then try
to load it into the Linux kernel using the command
For a ZIP drive that uses the USB-port the modules "usbcore",
"usb-ohci" (or "usb-uhci") and "usb-storage" must
be present in the Linux kernel. When they are not there,
then try to load them with:
Beware: You *either* need the module usb-ohci
*or* the module usb-uhci. Not both!. The module that loads without the
reply: "insmod usb-?hci failed"
is the correct one.
The command
Rule of thumb:
External Parallel- or USB-drives: /dev/sda4.
Internal IDE-drives /dev/hda4, /dev/hdb4, /dev/hdc4 or
/dev/hdd4. This depends on whether they are connected as master or as
slave on the first or the second IDE controller.
| /dev/hda4 | Master | Controller 1 |
| /dev/hdb4 | Slave | Controller 1 |
| /dev/hdc4 | Master | Controller 2 |
| /dev/hdd4 | Slave | Controller 2 |
SCSI-drives: /dev/sdX4 where "X" is the
SCSI-ID. This ID can usually be set with dipswitches at the drive
itself. The SCIS-ID with the lowest number is sda, second
lowest SCSI-ID is sdb
etc. (The command
If you want that all users
have write access to the ZIP-disk, then you have to set the
option umask=000 when you
mount the ZIP disk (The command is e.g.
Sometimes you have to use the option -t to indicate the type of
file system that resides on your ZIP-disk: msdos, vfat, ext2 etc.
(The command is then e.g.
The user root can now access the data on the zip disk through /mnt/zip.
The command" cp
With the command
You close the root window by giving the command "exit".
This makes it possible to access disk in your ZIP drive :-)
In worst case you cannot access your ZIP drive. In this case make a note to the developers of Knoppix through a form on WWW and wait for answer or write a bug report.
(When you want to know more about mounting disks read further here.)
[Back to the beginning of the page]